Tracking Progress & Linking Accounts
Knowing how well your assumptions have played out in the past is among the most important and most educational tools you have for gaining financial insight. How can you ever know where you're going if you don't know how you got here? In OnTrajectory, You can either manually update your progress or link an account to your financial institution to do it automatically.
1. Comparing Actual Progress to Calculated Balances
Track how your investments are actually performing against the growth assumptions you’ve made. This is a handy way to judge the validity of your % Growth assumptions and compare the amount to the actual value of your accounts.
If balances become VASTLY different, you may need to tweak the % Growth of an account. However, don’t be too concerned about small fluctuations, because that’s just how markets behave. In fact, the reason we display Projected Progress is so you can see the effects of market fluctuations without having to adjust your % Growth each time markets become volatile.
As soon as you start tracking your Progress, a green line is layered onto your Trajectory graph — the longer you track your progress, the more evident this line becomes (as shown below):
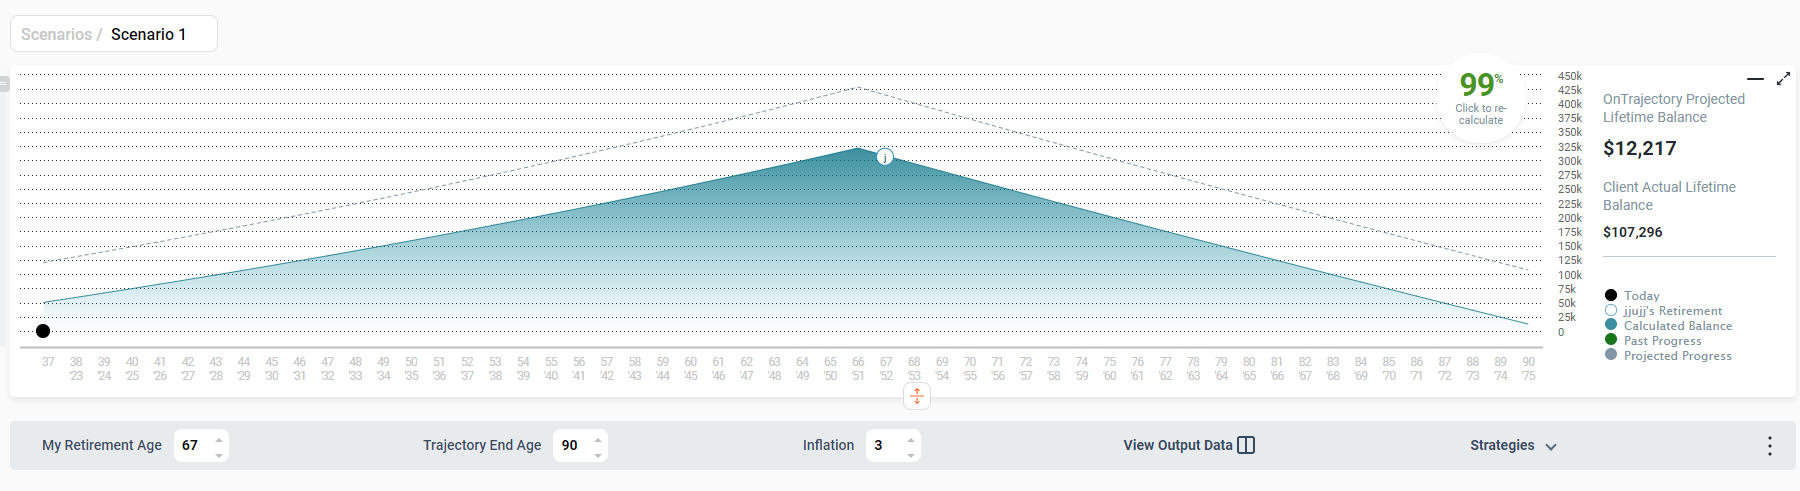
Also, once you begin to track progress, a gray dotted line is “projected” into your future and is based on the growth rates you have defined for each account. This line gives you some idea how market conditions might affect the outcome of your trajectory — but don’t read too much into it. Projected Progress is highly susceptible to market fluctuations. In fact, it's yet one more reminder how significant even small variations can be when compounded over large periods of time.
The Accounts, Assets & Taxes tab displays both your Calculated Balance and your Actual Progress by account, as shown below.

Calculated Balance is the account's approximate balance on the selected date and is based on the % Growth and Contributions you have defined. This value is not affected by updates to your progress — it is only affected by changes to the % Growth and Contributions/year fields. To view precise calculated balances, consult your Output Data Tables.
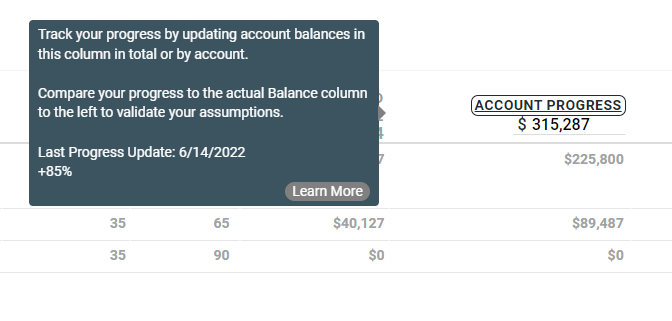
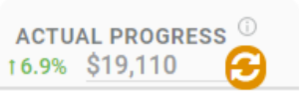
Actual Progress, on the other hand, reflects the actual amount you have in any given account on the selected date. The data can be entered manually or pulled from your financial institution if you have linked the account. In addition, the Actual Progress column header displays the sum total. And by holding the cursor over the Account Progress column, a tool-tip will open displaying the date of the last update. See screenshot below:
2. Manually Updating Progress in Aggregate or by Account
As previously mentioned, you can view your progress as a single aggregated amount, and also update your progress in aggregate. Enter a single total representing all your account's balances in the text-box above Actual Progress:
After entering a new total, press Enter to save. The total progress amount is added to your Progress History for the selected date, and assumptions are made regarding individual account balances based on relative proportions to the calculated total.
Note: Updating your progress in aggregate is available only if you have not linked any of your accounts to an institution. If you have linked one or more of your accounts, then manual updates are only possible at the account level.
To make updates at an individual account level, simply enter the current balance in the Actual Progress column and press "Enter". The data will be saved and updated in the Progress History table.
To view Progress History for past updates you've made (available only in the Unlimited Plan), click on the Account Progress column header. This will open the Progress History window:
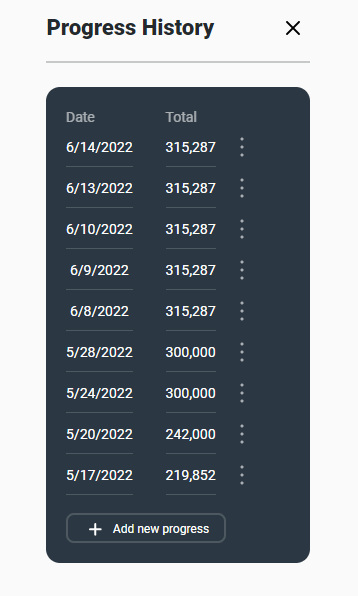
From Progress History, you can add a new progress, edit an existing one or delete one all together.
To create a new progress, click on the bottom button and the following window will open:
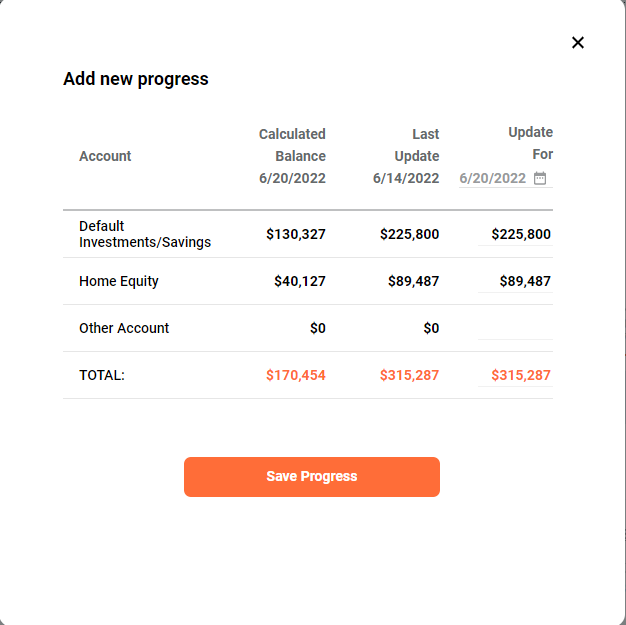
The new progress will default to today’s date, but that date can be changed by clicking on the calendar icon. You can then enter a value for each account or just enter an aggregate value in the Total field.
Editing a progress will open the same window. The only difference is that you cannot change the date on an existing update. You can, however, update any of the account values.
3. Linking Accounts to Your Institution for Automatic Updates
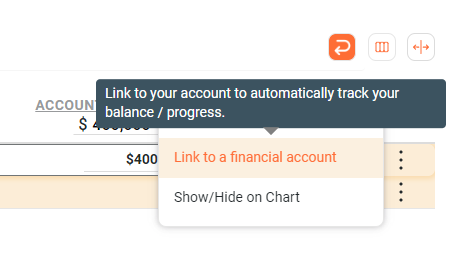
Link an existing account to your bank or financial institution by choosing ‘Link a financial account’ from the 3 dot menu available on any account row. Clients can link up to two financial accounts for free. To link 3 or more financial accounts, go to My Profile/Plans & Payment and toggle on 'Add Unlimited Account Linking for $3/month'.
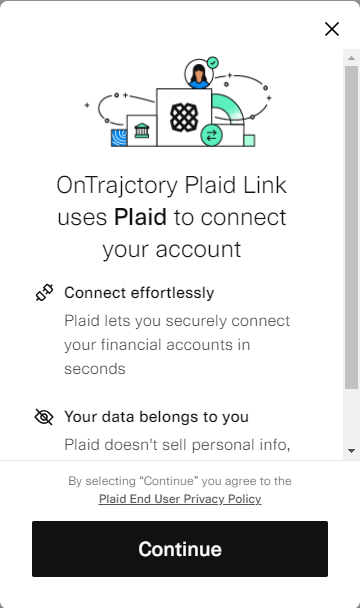
Follow the instructions to search for your institution and link your account. Note OnTrajectory does not store any of your credentials and all information is securely encrypted with technology provided by Plaid.com
Alternately, you can add a new linked account directly from the Add Account menu, as shown below:

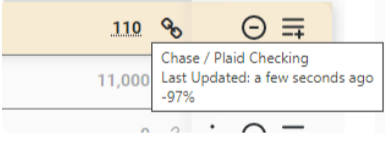
Once you have one or more linked accounts, the "Refresh Linked Accounts" button appears. Clicking will refresh balances on all accounts and save a new progress point in your Progress History.
Finally, you can see the exact time an individual account was last updated by hovering over its balance. Accounts that have not been updated more than 1-day ago, will appear in orange.
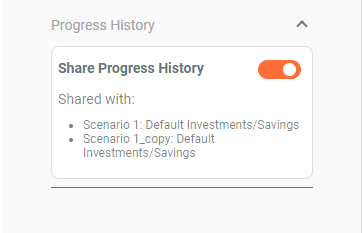
4. Sharing Progress History across Scenarios
You may want to share progress updates on an account across multiple scenarios. By default, if you copy an entire scenario, existing accounts will automatically share their progress history. However, if you created a new scenario from scratch, or you later added an account to 2 existing scenarios, progress history is not automatically shared, even if the account is named the same.
To create a shared progress history between scenarios, click on a row under the Accounts, Assets & Taxes tab and the Items Settings window will open.
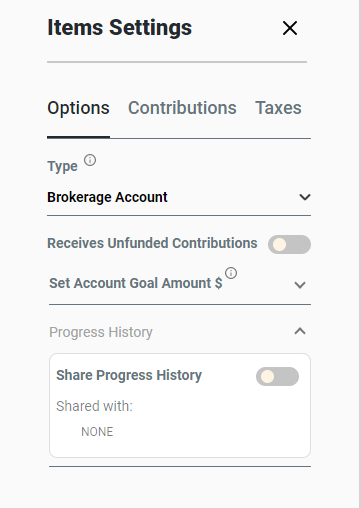
Enable Share Progress History and select which scenario and account you would like to share. (Note: You must have more than 1 scenario for this option to be visible.)
After selecting the option, pick the Scenario and Account with which you wish this account to share, and click OK.
The next time you open Item Settings, you will see a summary of any scenarios and accounts that are being shared. See screenshot below.